
Red Velvet Bars with Cream Cheese Frosting
Easy Red Velvet Bars with Cream Cheese Frosting recipe. The perfect dessert idea for Valentine's Day or Canada Day.

On our way back to reality from our road trip this year. We are stopped at our last hotel before we make the long drive home tomorrow.
I just wanted to come on here at least a little before Canada Day to include a recipe you can make for Canada Day. Or Valentine's Day. Or a regular Tuesday. You know, the special occasions.

So here's a recipe for Red Velvet Bars with Cream Cheese Frosting. Because really, who can say no to red velvet?
I know I can't. Just search "red velvet" in my search bar and you will see all the red velvet recipes I make on the regular. Whenever the red velvet craving hits, you can usually find me making my Red Velvet Mug Cake.

But I wanted to make a recipe that you can share with everyone this Canada Day. This is how these bars were born.
Sure, these bars do look more Valentine's Day than Canada Day. I wanted them to be more of a multipurpose recipe. But you can switch up the sprinkles to make them fit with whatever holiday you have in mind. St Patrick's day. Easter. Christmas. The possibilities are endless!

And while it's back to reality for me, I know that I can look forward to some of these bars that I tucked into the back of my freezer when I get home.
If you make this recipe, let me know how you liked it! Rate it, leave a comment and tag me with #atasteofmadness on Instagram! I always love seeing what you are creating!

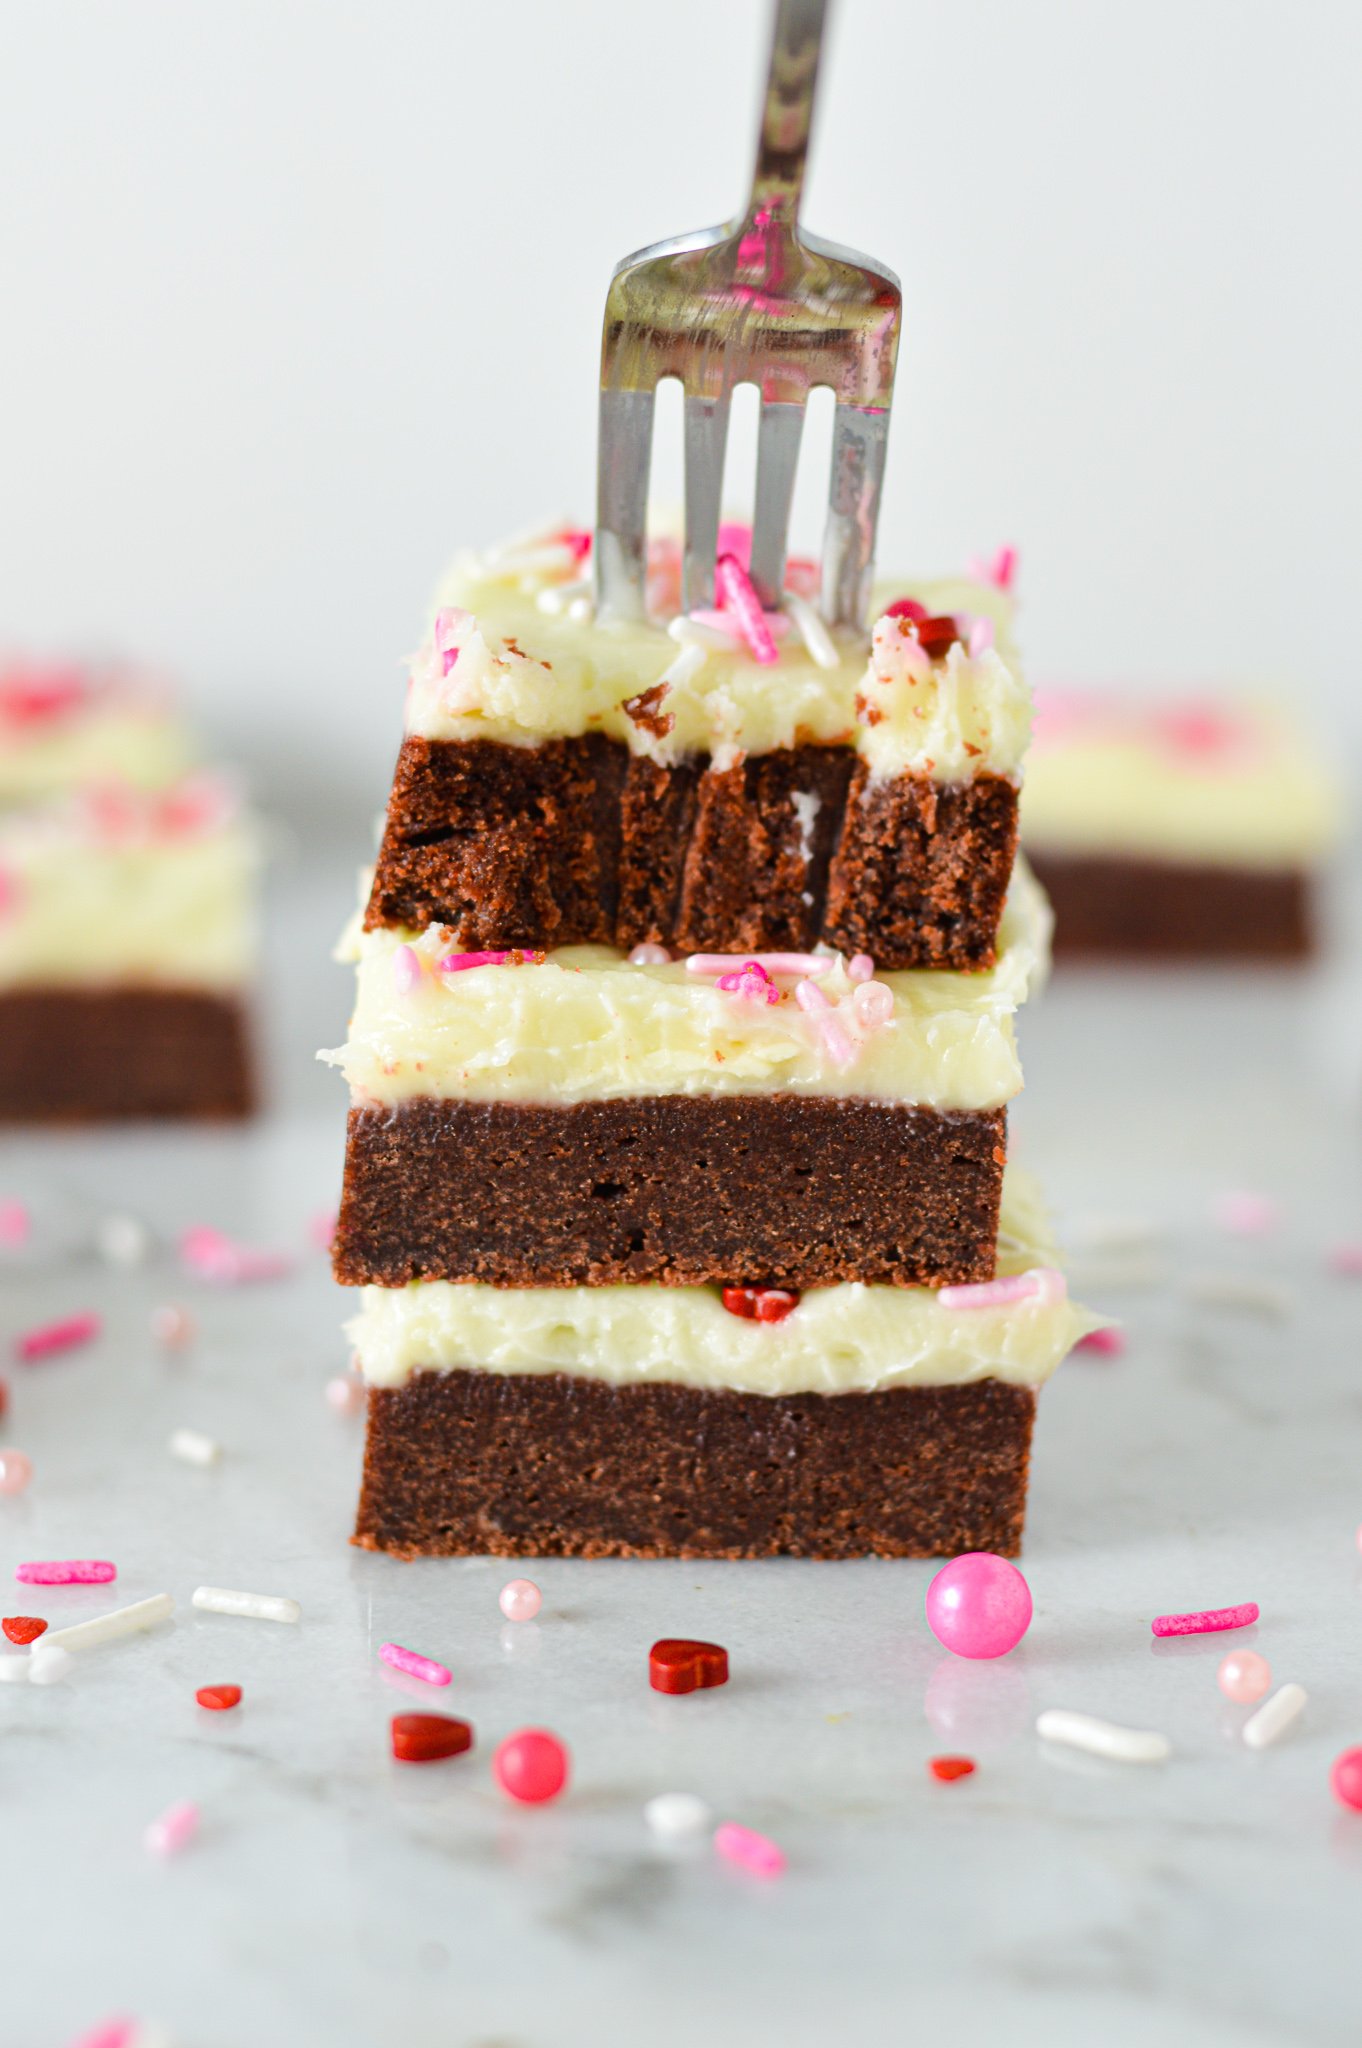
Red Velvet Bars with Cream Cheese Frosting
Ingredients
Bars
- 3 cups all-purpose flour
- ⅓ cup unsweetened cocoa powder
- ½ teaspoon salt
- 1 teaspoon baking soda
- 1 cup unsalted butter, softened
- 1 ½ cups granulated sugar
- 2 large eggs
- 2 teaspoon vanilla extract
- red food gel or food colouring
Frosting
- 16 oz cream cheese, softened
- ½ cup salted butter, softened
- 3 ½ cups powdered sugar
- 2 teaspoon clear vanilla extract
- sprinkles
Instructions
- Preheat the oven to 350˚F. Line a 9x13 inch baking pan with parchment paper and set aside.
- In a medium bowl, mix together the flour, cocoa powder, salt and baking soda. Set aside.
- In the bowl of a stand mixer, cream together the butter and sugar until light and fluffy. Add in the eggs one at a time, mixing after each addition. Mix in the vanilla.
- Slowly add in the red food colouring until it reaches your desired colour.
- Slowly mix the dry ingredients into the wet ingredients until just combined.
- Pour the batter into the prepared baking pan and bake in the preheated oven for around 15-18 minutes, or until a toothpick inserted comes out clean. Allow to cool completely.
- In the bowl of a stand mixer, cream together the butter and cream cheese. Slowly add in the powdered sugar until fully incorporated. Mix in the vanilla.
- Frost the cooled bars and decorate with sprinkles.

This is such a great treat! Red velvet is my favorite cake and seeing your recipe makes my mouth water.
My favourite too! Let me know if you give it a go 🙂
Red velvet cake is my favourite, and these bars look amazing. I could eat all that frosting.
The frosting is always the best part 😉
I love the fact that you don't need to bake an elaborate cake to get to the red velvet. With that cream cheese frosing. I could even eat cardboard, it s that good!! Yum.
Right?? So much easier!!
These were a must make and these were so addicting! Definitely a family favorite of ours! Excited to make this again!
It's a family favourite around here too! Thanks Beth!
These velvet bars would be perfect to eat anytime of year in my humble opinion. They look so good and are beautifully presented.
Thank you so much 🙂